A panoramic photo (or panorama) is an image that covers a wide-angle of view, with the goal being to capture as much of the visual environment as possible in order to create the illusion of presence.
If you’re thinking about taking panoramic photos, then it’s important to consider what tool is right for your needs.
The right tool can make all the difference when it comes to having success with your photos, so we hope you find this guide helpful.
Table of Contents
What is Panoramic Photography?
So, what really is a Panorama? Simply put, it’s a great method to capture views that may not fit into a regular photo.
These scenes could be too tall or too wide for a regular one, for example, a tall tree whose might you want to show off by capturing the panoramic image from its very roots to its majestic crown high in the sky.
Or, it could to utilized to fit every single one of your friends in the photo next time you go for a boy’s night out. Well, how does the Panorama accomplish this? I’m certainly glad you asked!
This is done by taking many images over the length of the scenery from top to bottom or start to finish.
Then, these are joined together neatly with one photo starting where the one before it ended, to give a finished product showcasing everything you’d want to see, in one picture.
Luckily, the software does the dirty work of adjoining images so you and I can see the finished result shortly after taking the picture.
Important Tools For Panoramic Photography
Sounds simple, right? Wrong! Taking a good Panoramic photograph is certainly a craft easy to learn but difficult to master, my friend.
Fortunately, we have found a set of tools that can help you achieve your dream of the perfect sunset, milky way, and landscape photography by the beach, breathing life into your screen and immediately taking you back to that vivid surrounding every time you rest your eyes upon it.
So, let’s stop beating around the bush and get right down to business!
1. Camera
The camera is obviously essential to panoramic photography. In order to capture a panorama, you’ll need a camera with manual shooting capabilities and image stabilization features.
Since there isn’t a perfect camera for panoramic photography, we have to keep many aspects in mind.
Since Panoramas generally show off a view quite larger compared to the classic photograph, it may help the cause if we use a wide-angle lens.
This would broaden your horizon, quite literally. Even more so, if we use a camera that lets you utilize wider angles without inflicting you with the crop factor.
However, if you feel like your current camera is just not enough, you should definitely consider a special “Panoramic Camera”.
These are manufactured to take sweeping photos, fully exploiting the film frame for a fuller image, without surrendering detail.
Examples may go from Fuji GX617, Hailed as the best wide-angle panoramic camera today, to “Spinner 360” which spins at 360 degrees to take very bizarre and fun panoramic photographs.
Panasonic LUMIX FZ300

- 4K video and 4K photo
- Leica DC Vario Elmarit lens
- High image Quality
- Rugged Camera Design
- 5 Axis Hybrid Optical Image Stabilizer
2. Tripod
This may be obvious but a tripod is a must-have for any avid photographer. These are portable devices designed with three legs, a flash unit, and a mounting head to support the camera itself for panorama photography.
These are convenient stands you can fit to carry in your bag and are used to stabilize photos, reduce camera shake at slow shutter speeds, and elevate and support the camera.
These also free your hands so you can take a self-portrait or sip hot coffee as your camera is hard at work capturing a time-lapse of the sunset over the summit.
Tripods are essential for Panoramas as you need stability to capture the imagery around you.
Shaking the camera by even a few millimeters will distort the photograph, making the tripod a must-have even for the most stable hands.
These also ensure you get your horizons perfectly horizontal or vertical while panning, depending on what’s needed through the bubble level built in the tripod.
I’d recommend a stable piece with a large rotatable center column to get the best 360 shots.
Neewer Camera Tripod Monopod

- SOLID CONSTRUCTION
- ULTRA-STABLE
- UNIQUE ROTATABLE
- CENTER COLUMN DESIGN
- HEAVY LOAD CAPACITY
- 360 Degree PANORAMIC VIEW
- MULTI-FUNCTIONAL TRIPOD
3. Lenses
Although there is no lens flawless for panoramic photography, we can find one that fits our needs quite easily. There are many varieties of lenses, each suited to a particular type of photography.
Macro lenses are used to create closed-up, huge photographs. These are great for nature sessions. A telephoto lens allows you to isolate an object that is quite far away, giving a narrower field of view, making these perfect for panoramic photographs.
Another handy type of lens is the wide-angle lens. These allow you to fit a larger scene into your picture, making it useful for landscape or nature pictures as well.
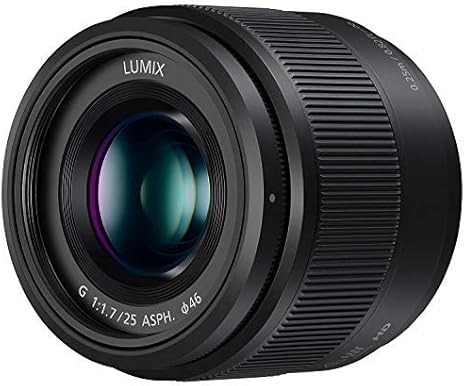
Panasonic Lumix G Lens

- A versatile 25mm lens
- Natural viewing angle
- Beautiful background bokeh effect
- Most popular protection filter
- Reduction of ultraviolet light
4. Light Meter
A light meter is a helpful tool for any kind of photography, but it is critical for panoramic photographers.
Since you’re creating large, sweeping photos, you have to ensure that each individual shot is exposed correctly.
You can’t make these kinds of adjustments after-the-fact in post-processing like you could with a normal photo; it’s all or nothing.
However, using a light meter will enable you to get your shots right on camera and save some time when editing.
Just take one reading from an area that you know should be properly exposed (i.e., not too bright or dark) and use those settings throughout your shoot.
If you don’t have a light meter, try an app like LightMeter by Rogue Amoeba ($5). It works with both iPhones and iPads.
5. Memory Cards
There’s little worse than realizing you don’t have a spare memory card when you’re out on an excursion.
Whether for work or pleasure, if you shoot with a DSLR or mirrorless camera that uses SD cards, it’s important to keep at least one extra card with you at all times.
Memory cards are relatively inexpensive and hold up to 12 gigabytes of data. If you’re shooting in RAW format, which most professional photographers do, each image takes up about 4 megabytes of space.
That means a 16-gigabyte card can store roughly 1,200 images.
If your trip is longer than two weeks (and isn’t just a vacation), consider getting two 16-gigabyte cards so you can swap them out as needed—that way you won’t be stuck trying to find storage space for your images while traveling through foreign countries.
6. Gear Bag
The first thing you’ll need is a sturdy bag to carry your gear in. In general, look for one that fits into an airline overhead compartment and/or has wheels for ease of transport.
Think about what you’ll be taking with you and make sure you have plenty of space left over; just because it’s a large bag doesn’t mean it should be overflowing!
Also keep in mind that many bags will come with a rain cover, which can be useful if you’re planning on traveling abroad or shooting outdoors during inclement weather.
A rain cover isn’t necessary but can certainly come in handy at times. Finally, consider how much weight you want to carry around.
If you’re going to be walking around all day with your camera equipment, then choose a lighter bag.
7. Software
Editing software is one of the most important tools for panoramic photography. Editing software can edit photos in all aspects. So, you should choose editing software according to your needs.
There are some recommended and easy-to-use applications for you, which are: Photoshop, Corel PaintShop Pro X6, PhotoScape, and GIMP.
The basic functions of these programs include cropping, rotating, resizing, and watermarking. Some additional features may be available such as red-eye removal or blemish removal.
You can also use them to combine multiple images into a single image or even create a 360-degree panorama from a series of photographs.
Tips on Taking a Panoramic Photo
- Choose a location with a lot of interesting and contrasting features.
- Take your tripod, cell phone, or other cameras to the location.
- Set up your tripod so that it is level with the horizon.
- Slowly rotate around this point of reference while taking pictures.
Conclusion
So, there you have it folks, four handy tools that can elevate your next panorama session to the next level. Remember to apply and adjust our recommendations to your need.
You also need some photo editing software like lightroom classic and adobe photoshop to make your panoramic photo stand out.
Be brave! Be bold! Don’t be afraid to take pictures out of the ordinary, as long as you look back at them after ten years and feel proud of what you accomplished. Take care!
